Category: sweets & cookies

  • Tocino de Cielo or Creme de Catalana

    Tocino de Cielo or Creme de Catalana

    creme de catalana or tocino de cielo

    I returned from a blissful, 11 day trip to Barcelona (with a two night detour to Budapest, of which I could write a hefty article about) where I ate and danced and lived like a Catalan princess, and skipped almost all the touristic activities that I’d be expected to partake, all in favor of getting a real feel for the city and surrounding towns. Being me, I researched a bit about Catalan food, and as I found myself in excess of 18 egg yolks one day, I sought out various versions of flan and creme brulee and…well, I stumbled on Tocino de Cielo, which, as far as I can tell, is very similar to Creme de Catalana, except it does not have the sugared, flame torched top similar to creme brulee. If you were to add it to this recipe, I believe you’d find yourself with Creme de Catalana.

    creme brulee containers white and blue from art & manufacture

    A pile of packages awaited me when I got back to San Francisco–among them these amazing creme brulee dishes I ordered from Edith at Art & Manufacture a few months back–telling her there was no hurry at all. I had almost forgotten they were coming and was delighted to unpack them. They made their way into a water bath the very next day, and I’ve used them for yogurt with rose jam and pistachios, Mato y mel and other dairy delights over the last week or so.
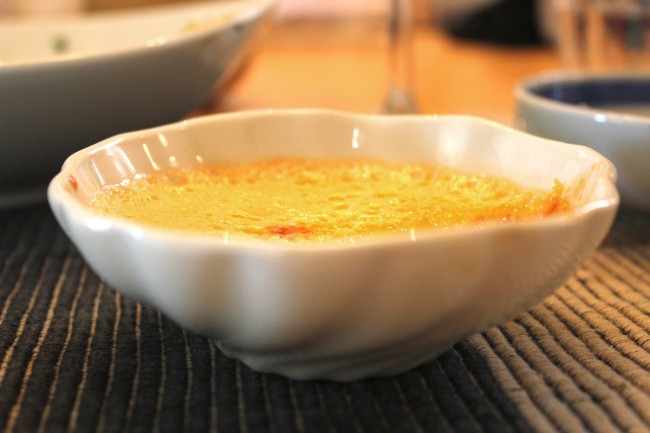
    tocino de cielo

    Tocino de Cielo / Creme de Catalana Recipe

    Makes five 5oz dishes

    Syrup
    1/2 C granulated sugar

    In a small pan, heat 1/2 cup sugar over medium-low heat and stirring regularly, until it comes to a medium amber color. It will clump and begin looking moist, and turn fairly quickly to syrup from there. Ensure no grains remain so that it will not crystalize. Remove from heat and divide immediately into one large dish that will hold 25 oz, or into five 6-8oz ramekins.

    Custard
    1/2 C granulated sugar
    1 C water
    one large strip orange peel
    one large strip lemon peel
    1 tsp vanilla extract
    6 large egg yolks
    hot water, for water bath

    In another small pan, combine sugar, water, and citrus peels. Bring to a boil. Using a thermometer, cook until sugar reaches 220F. Remove from heat and cool to room temperature. Remove zest strips and stir in vanilla extract.

    When syrup is mostly cool, preheat oven to 350F. In a large bowl, whisk yolks well until color lightens a bit. Whisk in cooled sugar syrup, then strain the mixture into something with a spout or that is easy to pour from. Divide the custard into the ramekins, on top of the cooled (and probably hardened) sugar syrup, leaving a bit of room at the top so you can move the container around easily.

    Place ramekins into a shallow baking dish, and place into the oven. Carefully pour hot/just boiled water into the baking pan, until about 2/3rds up the ramekins or container with the custard.

    If using small ramekins, less than 6 oz, bake for about 30 minutes. If using one large, shallow container, bake for 40-45 minutes. A sharp knife inserted gently into the center of one of the custards should come out clean, and they should jiggle only very slightly when moved. Do not overcook or they will crack when cooling.

    Carefully remove ramekins from water bath and allow to cool to room temperature– do not shock by putting directly into the refrigerator. The slow cooling allows the mixture to maintain a creamy texture. Cover with plastic wrap and refrigerate for at least 2 hours, until cold, before serving. If you used a smooth, easy container, you can invert when serving by moving a warm knife around the edges and inverting the container. I like to serve them as is.

  • Torta Caprese – Italian Flourless Almond Chocolate Cake

    Torta Caprese – Italian Flourless Almond Chocolate Cake

    torta caprese - italian flourless chocolate almond cake

    torta caprese - italian flourless chocolate almond cake

    I spent the weekend on a decongestant induced producivity high (that pseudoephedrine stuff really makes me unable to sit still! Sure clears out the sinuses though) which turned me into a bit of a domestic superwoman– cleaning floors, and bathrooms, and reorganizing my pantry, labeling all of my spices, and fertilizing the garden, and trimming it, and doing laundry, and making a delicious dinner of tri tip, chimichurri sauce + farro with fava beans, and washing/prepping all the produce in my refrigerator (which believe me, was a lot). To boot, I made this cake. And it’s delicious.

    Torta Caprese – Flourless Almond Chocolate Cake Recipe
    9 ounces (255 g) quality dark chocolate
    1 cup (225 g / 2 sticks) butter
    1/4 cup (25 g) dark cocoa powder (I scored some Valharona)
    1/2 tsp almond extract
    1 1/4 cup (250 g) granulated sugar
    1 3/4 cups ground almonds*
    6 eggs, room temperature

    *If you have whole, slivered, or other almonds, and a high powered blender or food processor, please toast your almonds to release the oil/fragrance for about 15 minutes at 310, and then grind into a meal (but not into a butter; you may need to “pulse” instead of blend to achieve this); otherwise, buy almond meal at your grocery.
    Preheat an oven to 310°F and line the bottom of a 9-inch spring form pan with parchment paper.
    Slowly melt the chocolate and butter over a double-boiler. In a stand mixer with a whisk attachment (or with a hand mixer), whisk together the melted chocolate mixture, the cocoa powder, almond extract and sugar until combined.
    Add the ground almonds and whisk until combined. Add the eggs one at a time, mixing well after each.
    Pour the mixture into the spring form pan.  Make sure the mixture is level and smooth on top.  Bake for 50-60 minutes.
    A note about oven temperature:  Make sure your oven is not hotter than 310 (or the temperature you intend to maintain through baking) when starting. You will avoid the “muffin top” problem I had by doing so; mine started at 325, so the cake puffed, and then the oven fell to 310, so it then sank, creating a two layered situation on the sides where the heat effected it most. It did take a full 60 minutes at a true 310.
    Serving: I’d recommend an unsweetened whipped cream, ice cream if serving the cake warm, and/or creme fraiche or mascarpone cheese with raspberries or fruit of your choice.
  • Venetian Fritole Recipe (Italian Doughnuts – Fritule)

    Venetian Fritole Recipe (Italian Doughnuts – Fritule)

    [donotprint]Venetian Fritole (Italian Doughnuts)

    In 2006 I was living in the heart of Florence and attending culinary school. The best class I took was the regional Italian cuisine course with Marcella Ansaldo — we made a few typical dishes from pretty much every region in Italy throughout the semester. One of the recipes was for Fritole – yeast-based Italian doughnuts from Venice, traditionally eaten for Carnivale.

    I posted about Fritole back in November of 2006–a few months after returning from Florence. I remade these delicious treats this morning; it is Easter Sunday and it made for a peaceful, tasty breakfast treat for the two of us. It’s a typical day in SF; the weather doesn’t know what it’s doing and it’s somewhere between heavy fog and rain, with a little bit of light poking through. We looked over our wet garden with some good coffee; fritole made the whole thing come together.

    Italian Fritole inside

    italian fritole with raisins
    [/donotprint]
    Note: You can prepare the dough the night before, leaving in a room-temp spot (not warm) overnight. Simply stir/punch down the dough in the morning, and let rise 30 more minutes before frying. It makes brunch a breeze!

    Italian Fritole Recipe

    1 1/2 C all purpose flour (200 grams) + 1 Tbsp
    1/2 C brown sugar (60 grams; can use granulated too)
    1 egg
    1 packet yeast (8-10grams; fresh brewer’s yeast is great too)
    1 C milk, divided (up to 200ml milk; any type)
    1/4 C golden raisins (50 grams; can use other types of raisins too)
    1/3 C dry sherry (or brandy, whiskey, flat champagne, etc)
    1/2 tsp salt (generous three-finger pinch)
    high-temp oil like peanut, safflower, or pine nut (most traditional) for frying
    powdered sugar for dusting

    Optional Ingredients (non-traditional):
    1/2 tsp orange blossom water (add with milk) or
    1/2 tsp cinnamon/nutmeg (add with flour) or
    2 T chopped almonds (add with raisins; you might consider a few drops of almond extract w/ the milk too)

    Combine the raisins with the sherry. You can substitute boiling water if needed. Microwave for 1 minute to warm combination and set aside to plump (5-15 minutes). Once plumped, drain the raisins and toss them with 1T flour until nicely dusted.

    Warm 1/2 C of milk to about 110 degrees; add 1 tsp brown or regular sugar and stir. Add the yeast (mixture should be warm when adding). Set aside to bloom (at least 10 minutes).

    Combine the flour, salt, and sugar. Whisk well. Use more flour if needed. Add the egg and dusted raisins, stirring gently but not thoroughly with a spoon. Add the bloomed milk mixture and stir until just combined. If the mixture is too dry (it should be sticky but combined, not runny), add more milk as needed, up to 1/2 C more. Cover the dough with saran wrap and let sit 1-2 hours in a warm spot*.

    Prepare a large plate with two-three layers of paper towels (a draining rack is ok too, but the towels might remove more oil). Get some chopsticks or heat-resistant tongs ready. Put a light dusting of flour over the top of your batter to make preparation easier.

    Heat oil in a wide pan with sturdy sides (like a high sided sauce pan) to medium high heat; the oil should be at least 1.5 inches deep. Once warmed, test a small dot of batter–it should rise to the top immediately and bubble around the batter, but not burn it in the course of a minute**. Using two large spoons, section just-smaller than an egg size scoops and gently place into hot oil. When deep golden brown, flip each doughnut over and cook; remove when evenly colored and cool on paper towels.

    Serve with powdered sugar on top.

    Makes 15 golf-ball sized fritole. 3 per person is sufficient.

    *If the dough sits more than 2 hours, simply stir around to deflate and let rise 30 more minutes. This can be repeated twice if necessary.
    **If the doughnuts seem to be cooking too quickly or getting too dark before you can flip them, lower the heat slightly and allow them to cook longer or else they will be gooey inside.

  • Oolong Tea Macarons with Tea Infused Buttercream

    Oolong Tea Macarons with Tea Infused Buttercream

    [donotprint]

    The Master Macaron Recipe

    A few months ago I pledged my friend P that I would attempt making a tea macaron. I was given some shake from a Wuyi oolong from Red Blossom (heritage tie luo han), and had to figure out how to get the flavor in. Turns out, it’s not so easy to make tea infused buttercream.

    Admittedly, this batch was a little screwy–I used some leftover egg whites (from one of those cartons that claims to be only egg whites) and everything was a little thinner than it should have been. In short, I don’t recommend using carton egg whites for macarons. It’s a bad idea. I’m confident if you follow the regular recipe with normal, fresh egg whites–you’ll be fine.
    [/donotprint]
    – sprinkle a bit of tea on each macaron before baking, or on 1/2 of the cookies.

    – use the buttercream filing, but reduce sugar to 1/4 cup. Separately, steep 2 T tea in 1/2 C heavy cream, strain well and press excess liquid out of tea. Chill the cream, and whip it into whipping cream– fold into finished plain buttercream and pipe the cookies


  • Whole Lemon Bars Using Whole Meyer Lemons

    Whole Lemon Bars Using Whole Meyer Lemons

    [donotprint]lemon bars with whole meyer lemons

    A very lovely coworker surprised me a few days ago with a gigantic bag of meyer lemons from a family tree in Napa. I sent about 1/3rd of them to my mom, used several in smoothies (which are not so blog worthy and are certainly very ugly looking with all the chard and other hippie hoo-da I’ve been drinking up, thus, the blog has been rather neglected lately for my newfound need to eat more vegetables in very boring forms), and the rest are either in these lemon bars or waiting to be devoured in the coming days.

    This recipe is only slightly modified from David Lebovitz’s Whole Lemon Bars recipe, with my notes and adjustments below. My favorite frequent visitor to Paris (who has on several occasions rubbed shoulders with Mr. Labovitz at certain company events!)  is coming for dinner Sunday and I imagine I’ll find some new, delightful way to use the lemons in our meal. You, reader, can look forward to that!
    [/donotprint]
    I did make these by weight and recommend you do the same if possible.

    Crust
    1 C flour (140g)
    1/4 C sugar (50g)
    1 stick butter, melted (113-115g)
    1/2 tsp vanilla

    Topping
    2.5 small organic meyer lemons
    3/4 C sugar (150g)
    3 large eggs
    4 tsp corn starch
    1/4 tsp salt
    3 T melted butter (45g)

    Powdered sugar for top

    Oven to 350–line a 8×8 inch pan in foil as smoothly as possible, matte side of the foil touching the bars/filling. Get the foil crisply into the corners.

    Mix the flour, 1/4C sugar, 1/4 tsp salt, stick melted butter and vanilla until just smoothly combined. Distribute the dough into the bottom of the pan evenly using hands or a spatula.  Bake for 25 minutes until golden brown.

    While crust is cooking, cut lemons in half and remove seeds. In a blender (I used my wonderful vitamix, but if you have a regular blender you may want to chop the lemons a bit), pulverize two lemons and the juice of 1/2 a lemon with the sugar until mostly smooth, a few chunks are good. Add the eggs, corn starch, salt and the rest of the butter, blending until smooth.

    Pour the lemon topping onto the crust when it’s done cooking, reduce the heat to 300 and return the dish to the oven for 25 more minutes, or until it stops jiggling and is set.

    Remove from oven, let it cool COMPLETELY before messing with it, then cut with a very heavy sharp knife into squares! Consider topping with powdered sugar and serving with tea.

    I recommend NOT leaving these in an air-tight container as I foudn it to make them go very soggy very quickly. Foil wrapped in bunches works much better, at least in SF climate!

  • Park Chow’s Cinnamon French Toast with Marscapone Cream

    Park Chow’s Cinnamon French Toast with Marscapone Cream

    [donotprint]Home made version of Park Chow's Cinnamon French Toast (recipe)

    For those of you in San Francisco, you can go and make your own comparison–but for the rest of you, you’ll have to trust me: the best French toast you’ll ever have is at Park Chow in San Francisco. It’s light, it’s crispy, it’s moist, it’s sweet and cinnamony. And, for weeks, I worked on perfecting my own version for a cinnamon french toast recipe. Here you have it–enjoy! (and if you’re really in for the whole experience, get some coffee from Thanksgiving Coffee Company–it’s where they get their custom blend!)
    [/donotprint]
    Mascarpone Cream Topping Recipe
    1/2 C heavy whipping cream, whipped very firm
    1/2 C room temperature mascarpone cheese
    1/2 C powdered sugar
    1/2 tsp vanilla
    2 T whiskey, creme de cocoa or other liquor of your preference

    Mix all ingredients with a hand mixer. In an ideal world, you’ll cover it (or put it in a mason jar like I do) and refrigerate it until very firm.

    Cinnamon French Toast Recipe – serves 3-4
    4-5 1 inch thick slices Semifreddi’s cinnamon twist bread (a brioche style loaf with a slightly stick outside & cinnamon layers), quartered to triangles
    3 eggs, whisked
    1/2 tsp kosher salt
    1/2 tsp cinnamon
    1 1/2 cup milk

    Whisk everything but the bread together, and then begin soaking the bread slices in the mixture. They should be pretty darn soggy.

    Cook in 1-2 T butter in a 10-12 inch skillet at medium high heat. If your slices are very thick, or seem not to be drying out, reduce heat and cover lightly with a lid to steam through. Serve with real maple syrup, warm.

  • Red Velvet Macarons & Thank You Gifts

    Red Velvet Macarons & Thank You Gifts

    red velvet french macarons made with italian method

    Another round of macarons..using the Italian method. Admittedly, I was a little rushed and a little lazy piping this out, so they are a bit unevenly sized.

    Basic French Macarons (Italian Method)

    Part One
    1 1/2 C powdered sugar (168 grams)
    1 1/2 C Almond flour (or other nut flour; 168 grams)
    2 large egg whites (55 grams)
    Any extracts (use sparingly, 1/4 tsp or less), cocoa powder, or food colorings are added in this stage

    Part Two
    2 large egg whites (55 grams)
    3/4 C granulated sugar (150 grams)
    1/4 C water

    Equipment
    Stand mixer (If you choose to use a hand mixer I recommend having four hands, or you will find this to be a pain.)
    Candy thermometer or good probe thermometer
    Piping bags (1 large, one smaller for the icing; I prefer to use one with a coupler)
    3/8 plain piping tip
    Non-temperamental oven, or oven thermometer and hawk eye

    Line 2 baking sheets with silpats or parchment; You may want to create a template to place below the parchment when piping of 1 inch circles. Prep your large piping bag with the tip, using a coupler or not. Preheat the oven to 275 F.

    Place two egg whites in bowl of the stand mixer and add the whisk attachment. Plug the beast in.

    In a bowl, preferably with a flat bottom, mix the powdered sugar and almond flour well. Add any powders such as matcha or cocoa at this time. For RED VELVET cookies/chocolate cookies, add 20 grams cocoa powder as a replacement for some powdered sugar. Always replace powdered sugar with dry flavorings in order to keep the balance of the batter. Add the egg whites and any food coloring and extracts such as vanilla, almond, etc. Mix into a paste with a large spatula, until it shows even color.

    In small saucepan on medium heat, bring water and sugar to a boil. Place the thermometer in the pan from the get-go, when it gets to 226F, begin whipping the egg whites on high. When the sugar reaches 230 (egg whites should be a bit foamy), remove it from the flame and add the liquid slowly to the whipping egg whites to create an Italian meringue. Continue whipping until the bowl is cool to touch, about 8 minutes or so, depending on the temp of the room.

    Fold the cooled meringue into the almond mixture. Notice that the batter looks like shiny plastic; watch for it to look like wet plastic shortly after the ingredients are combined. Be sure not to stir the batter, but to fold* cutting in and rotating the bowl. When it looks shiny, stop, and put it in the piping bag.

    *Find a youtube video on this if you aren’t sure how. The videos are all wrong, I just looked. None of them are quite right. The main thing is to put your spatula in vertical, like a knife. Then, pull it through along the side of the bowl and around, gently turning it over the center and letting the batter you scooped drop. Rotate the bowl 1/4 and cut into the center and do it again. Rinse and repeat. It’s important.

    Pipe them out into even 1-inch circles spaced 1 inch apart. Bake for 12-20 minutes; Mine took about 14. Check every 2 minutes after the first twelve by touching the top of the macaron with a flat finger and trying to shake it. The cookies are done when the top moves just a little against the ruffle.  Let them cool a minute or two before attempting to remove with a small, sturdy metal spatula. They taste best if you stick them in the fridge covered overnight, or even the completed cookies this way. They’re good up to five days, and the cookies without filling can be frozen.

    Cream Cheese Icing for Red Velvet Macarons
    4 oz cream cheese room temp
    1/2 stick butter room temp
    1/2 lb confectioners sugar
    1/2 tsp vanilla

    Mix butter and cream cheese – whip 30 seconds or so. Slowly add sugar with a hand mixer on low, scrape sides once in a while. Add vanilla and blend until fluffy, 1 minute.

    Italian Buttercream Icing – Great standard macaron filling
    2 egg whites (55 grams)
    1/3 cup plus 1 tbsp granulated sugar
    60g unsalted butter at room temp, roughly diced (just less than a 1/2 stick)

    Whisk together the egg whites and sugar. Set the bowl bain-marie style (over a pot of simmering water) and heat the mixture, whisking often, for 3-5mins until the  sugar has dissolved.

    Remove from heat and whisk on high speed with a hand mixer until it is stiff and shiny, similar to the Italian meringue made for the macarons. Add the butter slowly, one cube at a time, and continue to mix till all the butter is combined. Add any flavorings and refrigerate to firm up to use in a piping bag.

    You can flavor and color this icing many different ways; try adding some green tea powder when the sugar is melting, or some food coloring once it’s whipped up.

    ligurian olive oil

    & Thank you gifts! I hosted my old roommate (of Tuscany Road Trip 2006 fame) & her friend a few weeks ago; recently a surprise package arrived! She sent me delicious fig balsamic and extremely hard-to-get-my-paws-on Ligurian Olive oil!! Way to bring back awesome times, K! I spent lots of weekends in Cinque Terre when I lived in Florence, and it just brought back amazing culinary memories. I can’t wait to use it.

  • Fried Chicken on Fresh Corn, English Peas, and Kale; Plum Ice Cream

    Fried Chicken on Fresh Corn, English Peas, and Kale; Plum Ice Cream


    Fried Chicken Nuggets on Kale and Fresh Corn

    Fresh Plum Ice Cream

    Yesterday we had some new friends over for dinner, and I planned the menu while starving after my morning yoga class. I resurrected the tomato soup (tomato soup recipe) I always make (but haven’t for about a year), took a hint from a restaurant we went to recently and constructed a fried-chicken breast nuggets dish on fresh corn, English peas, and kale. I already had the peas and corn from my farm shipment and wanted to make sure they didn’t go to waste.

    Fried Chicken Breast Nuggets on Kale, Fresh Corn, and Fresh English Peas

    3 boneless/skinless chicken breasts
    1 1/2 bunches kale
    4 ears corn
    1/2 lb fresh English peas in pods
    Sunflower, avocado, or peanut oil enough to fry in a large, high sided skillet, about 2 cups or more
    2 T butter

    For Chicken Coating:
    1 C flour, set aside

    For Chicken Batter:
    1 tsp paprika
    1 tsp baking soda
    1 tsp baking powder
    2 egg whites (can use whole eggs if you prefer)
    1/2 cup milk

    Frying the chicken:
    Cut the breasts into a few different sized chunks in order for the chicken to cook evenly by being fried. None are larger than 1.5 inches thick, 2 inches long, 2 inches wide.

    Heat oil at least 1 inch deep in a large high sided skillet; do not fill the skillet more than half way. It should be about 375 degrees; if you don’t have a thermometer (I don’t), test it with a bit of batter.

    Generously salt & pepper two sides of the chicken pieces, and coat in flour. Dip into the egg mixture/batter, then back in the flour, placing within a few minutes into the hot oil.

    I fried the chicken in 3 batches in a 10 inch skillet to not over crowd.

    Chicken will become golden and firm when poked, flip it only once and remove and place on a rack or paper towels to drain. If desired, sprinkle with sea/kosher salt at this point.

    The vegetables:
    Ahead of time, wash and cut your kale–remove the thick stem, cut into 1 inch pieces. Boil some water, add salt when boiling and blanch the kale for a few minutes until deep green and tender. Drain and set aside.

    Wash the corn and cut it off the cob, remove the peas from their shells.

    While the oil for the chicken is heating, heat the butter in a skillet. When hot, add the corn and some salt, and continue stirring or flipping until 1/3 is golden/gaining color. Add the fresh peas and cook a few more minutes as the chicken finishes its last batch of frying.

    Assemble by placing the hot corn mixture on the plate or bowl, adding the kale and topping with the fried chicken.

    Plum Ice Cream:

    A friend and coworker gave me some delicious, overly ripe plums last Wednesday, so I made plum preserves of the immediately with very little sugar so they retained their color and tartness; I left them in as large of chunks as was possible and canned up two small jars. They came into play when I decided to make a delicious, custard-y vanilla ice cream and swirl them in.

    Adapted from David Lebovitz

    3/4 Cup milk
    1/2 Cup granulated sugar
    2 T brown sugar
    pinch salt
    3 egg yolks
    1 1/2 cups heavy cream
    1/2 plump, full size vanilla bean
    1/3 cup plum preserves

    Heat the milk, salt, and sugars in a saucepan over low heat until sugars combine and milk is beginning to look granulated/clear. While milk is warming, scrape the vanilla bean seeds out of the pod and add it to the milk, and add the pod itself too.

    Whisk lightly the egg yolks in a bowl and gradually add warm milk to temper/warm the egg yolks. Once warmed, pour the egg yolks into the sauce pan with the milk and stir well as you do so to prevent coddling.

    Cook over low heat, stirring constantly and scraping the bottom with a spatula until custard is thick enough to coat the spatula. Strain the mixture into the cold heavy cream, wrinsing the vanilla bean pod and adding it back in again. Chill thoroughly and then follow your ice cream maker’s instructions, adding the preserves when the ice cream is fairly thickened, almost done.

    Fresh Plum Preserves

    Plum preserves recipe: Wash, then cut plums into halves or quarters if they are still very firm, place in a pot, cover with about 1/8th to 1/6th the volume in sugar, the juice of a lemon or lime or more for a great quantity, and bring to a boil; immediately reduce to a simmer for just a couple of minutes, turn off, and can.

  • Vanilla-Mint Pu-erh Tea Ice Cream from Rishi Tea & Rishi Teas

    Vanilla-Mint Pu-erh Tea Ice Cream from Rishi Tea & Rishi Teas

    pu-erh ice cream made with Rishi Tea Vanilla Mint Pu-Erh

    Some regular readers may have noticed a certain obsession lately, namely that my creativity in the kitchen with concerns to ice cream has been largely centered around tea as of late. In terms of flavor, this is my favorite ice cream tea to date.

    This may not come as a surprise to anyone who makes ice cream at home, but I have finally concluded that anything less than 50% cream and 50% half & half is just not creamy enough to make a soft, scoop-able, delicious ice cream at home. The photo above was made with 100% half and half, and while the taste was delicious, the texture was lacking. So, I have amended my recipe below for your future success.

    1 oz Rishi Vanilla Mint Pu-Ehr Organic Tea
    1/2 pint organic half-and-half
    1/2 pint organic whole cream (I recommend Straus Family Creamery for your ice cream dairy products)
    1/3 cup sugar + 1/3 cup water
    Additional boiling water

    Combine the sugar and water and bring to the beginning of a simmer over heat to make a simple syrup. Turn off heat and reserve. Does not have to be cool to use.

    In a medium to large metal or glass bowl add the tea, but reserve from the 1oz enough for one pot–you should brew it when you eat the ice cream for a hot & cold experience. Pour enough boiling water over the tea to moisten all of it and let brew 1-2 minutes.

    At 1-2 minutes, add the half and half and the cream, then the simple syrup. Cover and let stand in refrigerator for at least 12 hours and up to 36. Optional: let stand at room temperature for 30 min-1hour for more intense flavoring, before placing in refrigerator.

    When mixture is fully chilled, follow instructions for your ice cream machine being sure to strain the mixture as you pour it into the machine.

    As a tangent, the folks at Rishi Tea are really down to earth. It came as a bit of a surprise to me that they’ve been around for more than 10 years, because they really run as a small, local company simply doing good business, and they have some really great products. Like my friend P at Red Blossom, they source their own teas and have personal relationships with the growers, and have some great products they offer for wholesale–so you can likely find their products locally if you prefer not to order online.

    If you enjoy less traditional teas such as blends or fruit infusions but appreciate excellent quality, for example, this vanilla mint blend, Rishi is a great source. I also enjoyed their “iron goddess” oolong, but as a moderately experienced oolong drinker (read: I have no right to be snobby and am only moderately more exposed to excellent teas than the next person), I’d personally return specifically for the flavored teas and look forward to experimenting with more of them in cuisine as well (plum oolong dashi with umeboshi-pork roll and shiso?? just an idea).

    Come to think of it, it’s pretty much summer, so some flavored ice tea could be in order for back yard get-togethers, and they seem to have some tasty options.