Author: Caroline

  • Crostini with Green Garlic & Fava Bean Chevre Spread, Delicious Home-made Sparkling Limeade

    Crostini with Green Garlic & Fava Bean Chevre Spread, Delicious Home-made Sparkling Limeade

    crostini with green garlic, fava bean and chevre spread

    crostini with green garlic, fava bean and chevre spread

    home made sparkling limeade

    Green Garlic and Fava Bean Goat Cheese Spread Recipe
    makes about 2 cups

    1.5-2 C shelled and blanched fava beans
    1 head green garlic, peeled of any extra tough leaves, stems chopped
    2 oz chevre/fresh goat cheese
    1/4-1/2 C olive oil
    1 T tasty light-colored vinegar of your choice
    zest and juice of 1 lemon
    salt & pepper to taste

    Combine all ingredients in a food process or or blender. Add oil as needed to blend smoothly. Delicious as a sandwich spread as well.

    Home-made Sparkling Limeade Recipe
    Method using a Vita-Mix or other high powered blender
    Makes about two large drinks

    2 whole limes, peeled and chopped in quarters
    1 T honey or agave nectar
    1/2 C water
    sparkling water

    Combine all but sparkling water in blender. Puree until very smooth. Can reserve up to two days in refrigerator. Add sparkling water to serve, as strong or mild as you like. Consider adding fresh strawberries and ice for a strawberry-lime sparkling smoothie, or adding iced tea for a home-made lime arnold palmer.

  • Tilapia with Lemon Verbena Cream Sauce on Arugula & Potatoes

    Tilapia with Lemon Verbena Cream Sauce on Arugula & Potatoes

    tilapia with lemon verbena cream sauce

    new potatoes and arugula

    lemon verbena cream sauce

    I recently changed CSA’s from Farm Fresh to You (which I did for nearly 3 years) to Eatwell Farms–I’ve only received one shipment, but was 100% delighted with the first one which included strawberries, red and white spring onions, huge arugula, fava beans, lettuces, braising greens and best of all–fresh lemon verbena. Normally I don’t like my food to smell like bath products I use or my bath products to smell like food, but in this case, it was a new challenge–I’ve never cooked with the stuff. I almost decided to start making home made face products alla Lush cosmetics, but thought better of it and remembered my growling stomach.

    Recipe: Tilapia with Lemon Verbena Cream Sauce on Arugula & New Potatoes
    For Two

    2 filets tilapia*
    4-6 cups fresh arugula, chopped coarsly
    6 small new (red) potatoes, sliced in 1/2 inch chunks
    4 T creme fraiche
    2 C fresh lemon verbena leaves**
    1/2 small/medium yellow onion, diced
    1/2 C wine
    4 T olive oil
    2 T white wine vinegar
    4 T butter, divided
    salt & fresh cracked pepper

    For the sauce
    Combine the onion, wine, and a generous few cranks of pepper in a sauce pan, and cook until almost translucent at medium heat. In a blender or food processor, add the lemon verbena leaves, white wine vinegar, olive oil and the slightly cooled onion mixture. Blend very well until evenly textured. Set aside and let cool. Just before serving, add creme fraiche and blend briefly to incorporate. Can be made ahead and refrigerated for several days. Flavor will mellow, however, and is most fragrant at room temperature, but most creamy/thick cool.

    For the fish and potatoes
    Using half the butter (2T), heat a large skillet to high heat and fry the potatoes until golden. If using a cast iron, turn off the heat and add the arugula, stirring to wilt. If using other pan, reduce heat to low and stir until arugula is wilted. Set aside and keep warm.

    Meanwhile, heat another skillet with other 2T of butter, and lightly salt/pepper the tilapia filets. Once butter is at medium high heat, add filets, turning when mostly cooked.

    Serve fish on top of potatoes and arugula, topping at last moment with fresh sauce.

    Great with a dry white wine like pinot blanc or pinot grigio from the north of Italy (Alto Adige region).

    * You can substitute halibut, basa, or other mild fish of your choice.
    ** Fresh lemon verbena is not that easy to come by and dries out very quickly once picked. You can substitute cilantro, but it will produce a very different but equally delicious sauce.

  • Fried Baby Artichokes & Potatoes with Flank Steak

    Fried Baby Artichokes & Potatoes with Flank Steak

    fried baby artichokes and fried potatoes

    grilled flank steak

    From A Platter of Figs – totally doable on a Tuesday night, shopping and all!
    Recipe for Fried Baby Artichokes and Potatoes with Flank Steak
    For Two

    1.5-2lb flank steak
    2 C new potatoes or other tender spring potatoes, washed, boiled until just tender and halved/quartered
    8-10 baby artichokes, outter layers peeled, tops cut off and halved or quartered*
    4 cloves garlic, minced
    10 sprigs parsley (or more/less), chopped finely
    1.5 C arugula, optional
    2 T olive oil
    lots of vegetable oil (sunflower or safflower or other high heat oil)
    salt & pepper

    * As you clean and prep the artichokes, place them in acidulated water (water with juice of a lemon or lime) to prevent browning.

    For the Steak
    Generously salt & pepper both sides of the flank steak and set aside. Can refrigerate overnight ahead or season within 2 hours of cooking and leave out at room temp.

    For the Potatoes & Artichokes
    Prep all ingredients ahead. Heat the grill for the steak and begin cooking steak as you start this processs:

    Heat a large skillet to medium high heat and cook the artichokes until beginning to color. This is to remove moisture and prepare for frying. Add the potatoes after about 2-3 minutes of cooking and cook. In a large cast iron or other high sided skillet, heat a generous inch of vegetable oil to frying heat. Test with a potato if needed for even bubbling. Add the potatoes and fry 1 minute, then add artichokes and fry all until deep golden. Remove and drain on paper towels or cooling racks.

    In original skillet, heat 2 T olive oil with garlic, cooking at low heat until flavor is infused, about 3 minutes. Add fried artichokes and potatoes, salt, pepper, and parsley. Toss and serve. * Original recipe calls to add fresh arugula to potato mixture if you like.

  • Torta Caprese – Italian Flourless Almond Chocolate Cake

    Torta Caprese – Italian Flourless Almond Chocolate Cake

    torta caprese - italian flourless chocolate almond cake

    torta caprese - italian flourless chocolate almond cake

    I spent the weekend on a decongestant induced producivity high (that pseudoephedrine stuff really makes me unable to sit still! Sure clears out the sinuses though) which turned me into a bit of a domestic superwoman– cleaning floors, and bathrooms, and reorganizing my pantry, labeling all of my spices, and fertilizing the garden, and trimming it, and doing laundry, and making a delicious dinner of tri tip, chimichurri sauce + farro with fava beans, and washing/prepping all the produce in my refrigerator (which believe me, was a lot). To boot, I made this cake. And it’s delicious.

    Torta Caprese – Flourless Almond Chocolate Cake Recipe
    9 ounces (255 g) quality dark chocolate
    1 cup (225 g / 2 sticks) butter
    1/4 cup (25 g) dark cocoa powder (I scored some Valharona)
    1/2 tsp almond extract
    1 1/4 cup (250 g) granulated sugar
    1 3/4 cups ground almonds*
    6 eggs, room temperature

    *If you have whole, slivered, or other almonds, and a high powered blender or food processor, please toast your almonds to release the oil/fragrance for about 15 minutes at 310, and then grind into a meal (but not into a butter; you may need to “pulse” instead of blend to achieve this); otherwise, buy almond meal at your grocery.
    Preheat an oven to 310°F and line the bottom of a 9-inch spring form pan with parchment paper.
    Slowly melt the chocolate and butter over a double-boiler. In a stand mixer with a whisk attachment (or with a hand mixer), whisk together the melted chocolate mixture, the cocoa powder, almond extract and sugar until combined.
    Add the ground almonds and whisk until combined. Add the eggs one at a time, mixing well after each.
    Pour the mixture into the spring form pan.  Make sure the mixture is level and smooth on top.  Bake for 50-60 minutes.
    A note about oven temperature:  Make sure your oven is not hotter than 310 (or the temperature you intend to maintain through baking) when starting. You will avoid the “muffin top” problem I had by doing so; mine started at 325, so the cake puffed, and then the oven fell to 310, so it then sank, creating a two layered situation on the sides where the heat effected it most. It did take a full 60 minutes at a true 310.
    Serving: I’d recommend an unsweetened whipped cream, ice cream if serving the cake warm, and/or creme fraiche or mascarpone cheese with raspberries or fruit of your choice.
  • Pan Seared Halibut on Asparagus Potato Hash

    Pan Seared Halibut on Asparagus Potato Hash

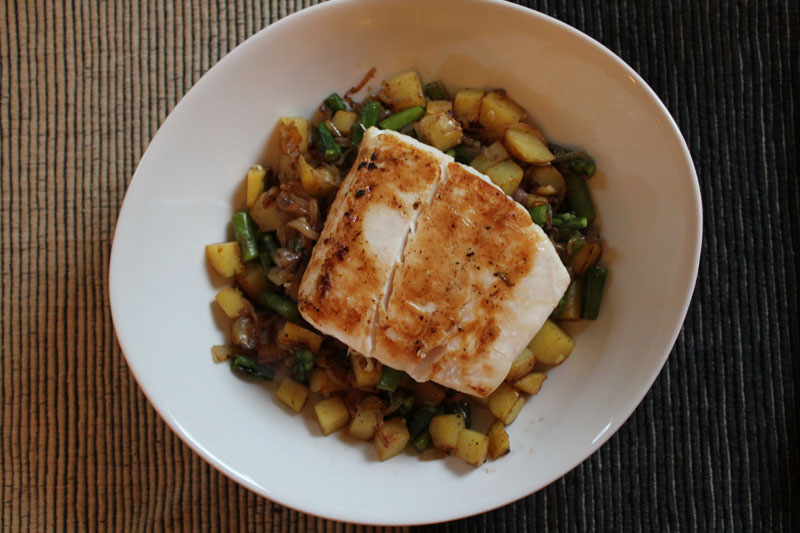
    pan seared halibut on asparagus potato hash

    pan seared halibut

    Pacific halibut, local asparagus, capay potatoes and leeks.

    Recipe: Pan Seared Halibut on Asparagus Potato Hash
    For One
    1/3 lb halibut filet, skinned
    8 spears asparagus, chopped in 1/2 inch segments
    1 leek, sliced finely
    1 small spring onion, diced, tender tops chopped and set aside
    2-4 T dry white wine
    3 T cooked farro or other grain (rice, etc– can omit as well)
    avocado oil or other mild oil

    In a 8 or 9 ” cast iron skillet (or other pan), heat 1-2 tsp oil at medium heat. Add the onion and leek, cooking until tired looking. Add the asparagus and cook 2-3 minutes until deeper green. Add white wine and cover loosely with a lid, steaming through. When asparagus is tender, remove lid and add farro and onion tops, cooking until hot. Place mixture into your serving bowl or plate.

    Bringing same pan to high heat, add a little more oil and fry the halibut on one side until golden. Flip, reduce heat to medium low, cover loosely with a lid and continue cooking a few more minutes until texture firms evenly and fish is cooked, about 3-5 minutes depending on filet thickness. Place on top of farro hash mixture and enjoy.

  • Flowers from Birite Market in San Francisco – California White stars, peonies, ranunculus & green pom poms

    Flowers from Birite Market in San Francisco – California White stars, peonies, ranunculus & green pom poms

    bouquet of white stars, ranunculus, and green pom poms from birite market in san francisco

    Visited Birite yesterday to get a couple of steaks and procured some beautiful spring flowers for our dinner party last night; the combination turned out beautifully.


  • Spicy Scallops on Pasta with Fiddlehead Ferns and Mozzarella

    Spicy Scallops on Pasta with Fiddlehead Ferns and Mozzarella

    spicy scallops on pasta with fiddlehead ferns

    Weeknight Pasta with Spicy Scallops, Fiddlehead Ferns and Mozzarella
    For Two

    4-6 scallops
    2 oz dry spaghetti (I used whole wheat bionaturae spaghetti. I actually like the flavor of it.)
    1-2 oz fresh mozzarella, chopped into chunks
    1 medium leek, chopped in short thin strips, white & light green only
    4 oz fiddlehead ferns, cleaned and trimmed (can sub asparagus, tender wild greens, or chicories)
    1 C white wine
    1 T butter
    2 tsp chili flakes, divided
    salt & pepper

    Salt & pepper the scallops; sprinkle sparingly with chili flakes. Bring water to boil, and prep all ingredients.

    Begin cooking the pasta. Meanwhile, cook the leeks at medium low heat for 5-10 minutes until coloring. Add 1 tsp chili flakes and fiddlehead ferns. Cook 2 minutes at medium high heat. Add about 1/2 C white wine and cover loosely with a lid; reduce heat to medium.

    In a very hot pan (cast iron would work best), sear the scallops and turn only when browned at high heat. If sticking when turning over, do not force. Add 1/2 cup wine, wait a moment and wiggle them free to flip.

    Add the pasta to the fiddlehead and leek mixture, turning heat up to medium high. Add the mozzarella and toss quickly. Plate with the scallops on top.

  • Halibut Belly with Ramp Vegetable Hash

    Halibut Belly with Ramp Vegetable Hash

    [donotprint]halibut belly with ramps pancetta asparagus and farro

    I made a pilgrimage to Rainbow Grocery over the weekend and scored some fiddlehead ferns, raw chocolate and among other things ramps. I spent most of the day thinking up how I should use said ingredients, with ramps and fiddleheads being new to my kitchen–I searched around and figured out the jist of what I intend to do (fish with ramps), but made my way to the grocery to pick up some fish to top it all off.

    I was hunting for halibut cheeks, and while my fishmonger didn’t have any for me, he did offer up the halibut’s belly (he disappeared into a walk in fridge and came out with the collar of the fish, and proceeded to slice a beautiful filet off for me) and I did take 3 oz of it home for just $0.58. “Fish Scraps for Stock,” it was labeled. Thanks, fishmonger!

    halibut belly cooking

    pancetta and asparagus

    fresh cleaned wild ramps[/donotprint]

    Recipe: Halibut Belly with Ramp Vegetable Hash
    10 minutes prep / 10 minutes cook
    Serves 2
    6 oz (for two) halibut belly or cheeks
    12 thin spears of asparagus, chopped to 1/4 inch or less
    2 oz pancetta, cubed
    3 oz fresh cleaned ramps, sliced finely, greens set aside
    1/2 C farro or other grain, cooked
    1/2 C white wine


    In a skillet at medium heat fry the pancetta. When browned, add the asparagus and cook until almost tender. Add the ramp whites, and salt, cook until slightly browned. Add farro and ramp greens, cook until wilted and hot.

    Meanwhile, in a skillet at high heat, fry the salted & peppered halibut belly in a small amount of oil, turning when brown. If sticking, deglaze with white wine, and then flip over.

    Assemble and enjoy!

    Notes
    – You can replace the farro with: wheat berries, wild rice, kamut, barley or other whole grain or omit it entirely
    – You may substitute for the ramps: shallots, spring onions, or leeks
    – If you omit the pancetta, be sure to add some olive or walnut oil


  • Biggest Food Secret EVER: Gourmet Popcorn At Home

    Biggest Food Secret EVER: Gourmet Popcorn At Home

    [donotprint]fire roasted pepper popcorn

    Turns out, I’ve been fooled my entire life. You can pop corn kernels in a paper bag in your microwave. Like normal microwave popcorn. For the same amount of time. Without all the hydrogenated shelf stable oil crap. And you can totally reuse the bag (like, from bringing two pints of ice cream home from the corner store and then several times as a popcorn bag)!

    I don’t know if anyone else has been torn about giving in to this trend in restaurants lately– $6 or more a pop for specialty popcorns like maple-bacon, chipotle caramel, truffle butter, and more variations with bacon. I imagine ones with curry and indian spices, meta-gourmet (you know, we’re so gourmet that we serve sweet breads even though they are totally ghetto? the gentrification of food?) powdered cheeses and whatnot have been done too. I have to admit, I’ve given in to it. Woe was me spending $8 on a small bowl of popcorn and a $10 cocktail.

    So I’ve been making healthier things lately (have you noticed?), and so I looked into air-popped popcorn. I was convinced without a $30 contraption I’d be forced to eat fake butter flavor and pay $4/a packet for Newman’s Own popcorn (or Orville, let’s be real).

    Air popper? Totally obsolete and never necessary in the first place. And yet, my family had one in the early 90’s during the low-fat craze. We’re smart people; somehow that slipped past us. So, don’t feel bad, just go get that thing out of your cabinet and rejoice in the new space you have made for a paper bag to call home. Or a new Staub pan.

    fire roasted pepper popcorn

    cooking popcorn in a paper bag

    I’ve been known to hoard glass jars that can be reused. This goes from jelly jars to tomato jars to salad dressings to anchovies and spices. As you can see, it comes in quite handy. Because I live in a 100+ year old house, and mice are unavoidable if you tempt them, I swapped to all glass and steel containers about a year ago to deter them from my rather large stockpile of food (we won’t go hungry from an earthquake). I also use these jars when shopping bulk at the stores around SF, for leftovers, and for taking my food to work each week–I don’t like to reheat in plastic, so having glass makes things easier to store and then eat.

    multi color popcorn kernels
    [/donotprint]
    Fire Roasted Pepper Popcorn Recipe
    Makes 4-5 Cups
    1/4 C popcorn kernels (multi colored, white, or yellow-your choice)*
    1 Tbsp butter (plugra if you have it around), melted and warm
    1/2 tsp sea salt
    1 tsp paprika
    1/2 tsp chili powder
    1 paper bag (bigger than lunch size but not grocery size–two bottles of wine size)

    Add the popcorn kernels to the paper bag and fold the top of the bag several times to halfway. Put the bag in the micro and set it for 5 minutes. You’ll probably only need 2.5, so stay close and stop it when the pops are 1-2 seconds apart.

    Add the spices to a old spice jar with a shaker lid and mix.

    Place popped popcorn in a large bowl, and season it in two batches:  drizzle butter over the first half and add half the seasoning. Toss, add the rest of the popcorn and repeat.

    * If you are having trouble finding popcorn kernels where you live (they are normally sold in bulk) and have access to a Whole Foods Market, they usually have them in their self-serve bulk section. You can also buy them on Amazon.

  • Venetian Fritole Recipe (Italian Doughnuts – Fritule)

    Venetian Fritole Recipe (Italian Doughnuts – Fritule)

    [donotprint]Venetian Fritole (Italian Doughnuts)

    In 2006 I was living in the heart of Florence and attending culinary school. The best class I took was the regional Italian cuisine course with Marcella Ansaldo — we made a few typical dishes from pretty much every region in Italy throughout the semester. One of the recipes was for Fritole – yeast-based Italian doughnuts from Venice, traditionally eaten for Carnivale.

    I posted about Fritole back in November of 2006–a few months after returning from Florence. I remade these delicious treats this morning; it is Easter Sunday and it made for a peaceful, tasty breakfast treat for the two of us. It’s a typical day in SF; the weather doesn’t know what it’s doing and it’s somewhere between heavy fog and rain, with a little bit of light poking through. We looked over our wet garden with some good coffee; fritole made the whole thing come together.

    Italian Fritole inside

    italian fritole with raisins
    [/donotprint]
    Note: You can prepare the dough the night before, leaving in a room-temp spot (not warm) overnight. Simply stir/punch down the dough in the morning, and let rise 30 more minutes before frying. It makes brunch a breeze!

    Italian Fritole Recipe

    1 1/2 C all purpose flour (200 grams) + 1 Tbsp
    1/2 C brown sugar (60 grams; can use granulated too)
    1 egg
    1 packet yeast (8-10grams; fresh brewer’s yeast is great too)
    1 C milk, divided (up to 200ml milk; any type)
    1/4 C golden raisins (50 grams; can use other types of raisins too)
    1/3 C dry sherry (or brandy, whiskey, flat champagne, etc)
    1/2 tsp salt (generous three-finger pinch)
    high-temp oil like peanut, safflower, or pine nut (most traditional) for frying
    powdered sugar for dusting

    Optional Ingredients (non-traditional):
    1/2 tsp orange blossom water (add with milk) or
    1/2 tsp cinnamon/nutmeg (add with flour) or
    2 T chopped almonds (add with raisins; you might consider a few drops of almond extract w/ the milk too)

    Combine the raisins with the sherry. You can substitute boiling water if needed. Microwave for 1 minute to warm combination and set aside to plump (5-15 minutes). Once plumped, drain the raisins and toss them with 1T flour until nicely dusted.

    Warm 1/2 C of milk to about 110 degrees; add 1 tsp brown or regular sugar and stir. Add the yeast (mixture should be warm when adding). Set aside to bloom (at least 10 minutes).

    Combine the flour, salt, and sugar. Whisk well. Use more flour if needed. Add the egg and dusted raisins, stirring gently but not thoroughly with a spoon. Add the bloomed milk mixture and stir until just combined. If the mixture is too dry (it should be sticky but combined, not runny), add more milk as needed, up to 1/2 C more. Cover the dough with saran wrap and let sit 1-2 hours in a warm spot*.

    Prepare a large plate with two-three layers of paper towels (a draining rack is ok too, but the towels might remove more oil). Get some chopsticks or heat-resistant tongs ready. Put a light dusting of flour over the top of your batter to make preparation easier.

    Heat oil in a wide pan with sturdy sides (like a high sided sauce pan) to medium high heat; the oil should be at least 1.5 inches deep. Once warmed, test a small dot of batter–it should rise to the top immediately and bubble around the batter, but not burn it in the course of a minute**. Using two large spoons, section just-smaller than an egg size scoops and gently place into hot oil. When deep golden brown, flip each doughnut over and cook; remove when evenly colored and cool on paper towels.

    Serve with powdered sugar on top.

    Makes 15 golf-ball sized fritole. 3 per person is sufficient.

    *If the dough sits more than 2 hours, simply stir around to deflate and let rise 30 more minutes. This can be repeated twice if necessary.
    **If the doughnuts seem to be cooking too quickly or getting too dark before you can flip them, lower the heat slightly and allow them to cook longer or else they will be gooey inside.