Author: Caroline

  • Zuppetta di Mollusca

    Zuppetta di Mollusca

    This is a Sardengna style recipe for the classic Italian dish of “zuppetta di mollusca,” or, mussels in a light stew. This is relatively inexpensive to make and very fast to cook, though I don’t recommend eating bottom-feeders like mussels and clams often. You can also add clams to this dish though I’ve found its difficult to find delicate and tasty clams in the US–they are always quite large and rubbery no matter how you cook them.

    For four, medium small portions:

    1 large shallot, finely chopped
    3 garlic cloves, smashed & chopped
    chicken stock (your own, about 2-3 cups, or the kind in a box; or vegetable stock)
    ciabatta or other non-sourdough bread
    1-2 lb mussels, I prefer mediterranean mussels
    dried chili flakes
    saffron
    parsley (fresh)
    chives or garlic chives
    olive oil
    white wine (optional, but good: vermintino or falanghina)
    salt & pepper

    Clean the mussels. Some mussels come mostly cleaned: there is little debris or gunk on the outside of the shells and the beards have been removed. If this is not the case, pull the beard with your fingers (it ends on the FLAT side of the mussel) and yank it out. Soak the mussels in fresh room temperature or slightly cool water (unless they are green-lipped, and then you should ask your distributor), for about 10-25 minutes so they can expell sand and debris.

    If they are pretty gunky on the outside, scrub them with a brush. Make sure they are all alive: if they are closed, they are alive. If the shell is broken, throw it out (unless tightly sealed despite this), if they are open and do not close when you knock them on the counter top, throw them out. If you eat a previously dead mussel, you will likely get sick.

    Start by warming olive oil (a few tablespoons) to medium high heat. I like to use a wide, somewhat shallow non-stick pan, but a pan for duck confit or other wide, low sided pan will work. It is good if you have a lid that fits it, or at least one that fits over most of the surface.

    Once the oil is hot, add the shallots and garlic, and salt & pepper, reducing the heat to low-medium. If you like it spicy, add the pepper flakes now. Cook until mostly translucent. Add half the chicken broth and a quarter cup to half cup of white wine, turn heat to high. When bubbling (obviously has gotten hotter), add mussels and put lid on or cover as best you can with a lid. Leave it alone for three minutes. Check on the mussels. They are done when the shells open and the mussels have plumped up and pulled mostly away from their shells. If there are still some closed, put the lid back on and wait some more.

    When the mussels are cooked, reduce heat to medium and add more chicken stock, as well as the saffron (a heavy pinch, crushed between your fingers). If you didn’t before, add the chili flakes. Drink some Vermentino or Falanghina while you wait. (My favorite falanghina available in the US is “Falanghina dei feudi di san gregorio.” 2005 is the current vintage. My favorite Vermintino is any from Sardegna; Tuscany also produces it but I prefer the Sardengnian).

    Let the fluid reduce a little. Add the chopped chives & parsley. The goal is to be able to place two or three slices of toasted, sliced ciabatta in a bowl and pour the mussels & some broth to soak up into the bread. When you think the right amount of broth for however many people you are serving is ready, serve it up.


  • Sicilian Chocolate & Simple Crostini

    Sicilian Chocolate & Simple Crostini

    I’m seeing a lot of repeat visitors from the bay area, and sometimes I wonder who they are that aren’t leaving any comments. I think I know some of you, and don’t want to know some of you, and wish I knew others who I haven’t met. It’s a little disturbing when someone takes a link from yahoo searching for my real name, ends up here, and I have no idea who they are. But on with business..

    So one of my very favorite simple things to make as a snack of meal is crostini. There are many, many variations of this, some more traditional than others, but the jist is this: Bruschetta (Bru-SKET-tah) is a piece of bread with stuff on it (simple; not overloaded, generally) that is fairly large, like an open-face sandwich. In America, it is used to encompass only one thing: bread with olive oil and tomatoes or some variation of this. In Italy, it refers only to the idea that it’s toasted bread with a topping and the bread is generally a particular size. Crostini, on the other hand, are smaller, usually the size of a diagnoally sliced baguette, often also thinner sliced than bruschetta. Crostini has similar toppings, often the same toppings, as bruschetta in Italy, but in the US a trendy restaurant that has crostini is probably serving you an assortment of different breads with toppings or tapanades.

    A few weeks ago I made two simple crostinis:

    sliced sweet Italian baguette with gorgonzola, slices of pear, and honey drizzled on top

    (these are put under the broiler for a few minutes until browned and gorgonzola warmed and slightly melted: be sure to use D.O.P. Mountain Gorgonzola from Piedmonte, expect to pay about $20/lb for this in the US), the honey can be put on after the broiler if you like. I also use chestnut honey from Italy or France as it has a VERY particular flavor. I’m not a fan of the fancy honey trend that’s been going on in the US, and find many of htem taste about the same, but CHESTNUT honey is something entirely different that you should definately give a try. Some people don’t like it, but if you do, it’s wonderful. Try it also drizzled on young pecorino cheese.

    the other crostini I made was Prosciutto di Parma with fresh Pecorino sliced thin and a bit of pear to brighten it up (and to get my serving of fruit). This was also put under the broiler until the prosciutto crisped up and the fat melted a bit. I drizzled olive oil on the bread of this one before putting the other toppings on, but did not on the other crostini because of the cheese.

    Also, Sicilian chocolate is becoming trendy and available in the Bay Area. A readily available one is “casa don Puglisi” which you can find in several infused flavors: bergamont, ginger, cinnamon, peperoncino, and more. Sicilian chocolate is kind of like Ibarra or mexican chocolates, where it is grainy and less refined, the cocoa and the chocolate smushed together and when you open it it may look like it underwent a temperature change, but it’s normal for the cold process they use to make it. It’s delicious and the infused flavors are always subtle and not overwhelming, and only add complexity. It’s also great made into a drink with milk or water or both. So satisfying.

  • Abbacchio alla Romana (Leg of Lamb)

    Abbacchio alla Romana (Leg of Lamb)

    A few nights ago, as a gift to my good friend Eugene, I cooked the leg of lamb he had bought (Eugene can cook himself, but having someone prepare the meal & clean up is something else).

    Traditionally, Abbacchio alla Romana is parts of a baby lamb that has only had mother’s milk cooked in a particular way; since this is difficult or impossible to get in the US short of having your own farm, I substituted a butterflied leg of lamb (Normally the leg, cage, and shoulder including the bones would be used). I love this recipe because the anchovies and vinegar take away the heavy, overwhelming flavor of the lamb and make it really delightful. This recipe is from Lazio, specifically, the Rome area.

    I started by trimming the pearlescent membrane like stuff off the lamb as well as the excess fat, and made sure the lamb was evenly cut; I then folded it into a round and ideally would have tied it but didn’t have any butchers’ twine.

    You will need:

    Leg of lamb (butterflied, about 3 1/2 to 4 lbs)
    garlic
    olive oil
    chili flakes
    anchovies in oil
    sherry or red wine vinegar
    fresh rosemary

    Olive oil, into a hot pan. Use pleanty as you don’t want it to stick. Ideally, use a cast-iron skillet, with high sides, or anything other than a non stick, with enough surface space and some squared off sides. I used about half a cup for a 3 1/2 pound leg. Crush three to six large garlic cloves to remove the skins; do not chop, just throw into the hot olive oil (medium high heat). Add chili flakes, about a teaspoon or more or less depending on your taste. Lower the heat to medium low. Let the garlic cook for a few minutes, careful not to burn it. Preheat your oven to 380 degrees.
    Raise the heat again to medium high or a little higher than that. Once it heats a little more (a minute or a little less), put the meat into the pan, a nice side down to brown it. It should cook this way a few minutes. Move the garlic around a bit so that it doesn’t burn at this higher heat. Chop the rosemary and the anchovies (use about eight filets). Turn the meat once one side is brown; keep doing this until all sides are brown (pretty much). When you’re on the last side, add about 1 cup of the sherry or red wine vinegar to the pan, as well ast he rosemary and anchovies. Try to put it all over the meat evenly and some into the pan. Cook until the very strong vinegar smell is gone, and then put the pan into the oven. Cook for about 20 minutes–check either with a meat thermometer or with your gut (I just push with a spoon against the meat to see how it responds; it should move a bit like when its raw but more firm for medium rare); remember it will keep cooking quite a bit once it’s out for about ten minutes. Let it rest ten or fifteen minutes before carving.

    If you desire, you can remove the meat from the pan, put it back on a burner and add a quarter cup to a half cup of good red wine, let it reduce on medium high heat, and then turn the heat off, add a few tablespoons of very cold butter, and fresh herbs (rosemary, chopped finely), and make the “gravy” into an actual sauce; I did not do this, instead we just spooned the gravy left in the pan over the meat and onto our mashed potatoes (where we also put the garlic). I served it with butter sauteed asparagus.


  • St.Louis Ravioli – handmade beef & pork ravioli

    St.Louis Ravioli – handmade beef & pork ravioli

    [donotprint]St. Louis Style Beef Ravioli

    So I had this craving for the traditional meat ravioli that the Italian population in St.Louis is known for (I was feeling a little homesick). I can’t replicate the “fried ravioli” (nor do I really want to right this moment), but the filling is really the important part and I felt inspired. However, I had a moment of laziness and bought some spinach pasta sheets (fresh) from Berkeley Bowl to shortcut my ravioli making. Should you not have this luxury, use a simple egg pasta recipe like the one you can find in this entry on Fresh Italian Egg Pasta, and be sure to not roll the sheets too thin for the purposes of ravioli.


    [/donotprint]
    Beef & Cheese Ravioli Filling
    1/4 lb lean ground beef (I used grass fed)
    1/3 lb ground pork (I used organic/all natural)
    1/2 medium to small yellow onion
    2 crushed garlic cloves, loosely chopped
    thyme fresh or dried to taste
    a small amount of ricotta cheese (2-6 T to taste)
    bread crumbs
    salt & pepper
    [donotprint]
    I made the sauce at the same time which required:
    [/donotprint]
    Simple Tomato Sauce
    olive oil
    san marzano D.O.P tomatoes imported from italy, one large can or one large jar
    2 crushed & course chopped garlic cloves
    1/2 medium to small yellow onion

    I chopped the onion finely and the garlic as well and sauteed it together in olive oil with a heavy pinch of large grain salt for both the ravioli and the sauce. When the onions were soft (do this on fairly low heat for a longer time; if you blast the garlic it will be colorful and bitter and have no flavor, even if it smells good), I added a little less than a quarter cup of olive oil to a hot sauce pan and then a little more than half of the onion & garlic mixture. I added thyme to both the large sautee pan which would cook the filling and to the sauce pan.

    Next, mix the two ground meats  and then drop them in chunks into your sauce pan, turning the heat up to about medium. Make sure there is enough salt, pepper, and thyme.

    Let the sauce simmer: it’s just garlic, olive oil, onions, thyme, tomatoes. Put it on low and leave it while you do everything else. This sauce can be modified with jalapeno or other peppers or chili flakes to make arribiata sauce, with capers to make puttanesca, with meat cooked in the same pan for bolognese.

    Once the meat has cooked through, put everything from the pan including the drippings into a food processor. Add two good handfuls of breadcrumbs, a few tablespoons of ricotta (preferably you will push this through a fine mesh strainer with a spatula first to improve the texture), salt & pepper, and I had some pesto from Berkeley Bowl sitting around (mostly parsley, a bit of walnut) so I added a few spoonfuls of that too. Grind it until it’s fine, adding bread crumbs or ricotta as needed to achieve a nice moist consistency but where the filling rolls into a ball inside the food processor and is still moist enough to stick together well.

    Cut your raviolis. I used a biscuit cutter. You can cut squares or whatever other method you have. The important thing is to NOT OVER FILL the ravioli. Wet with your finger & some water around the edges of each ravioli (one side of the two pieces) to seal them, making sure to push as much air out as you can as you go around and seal them.

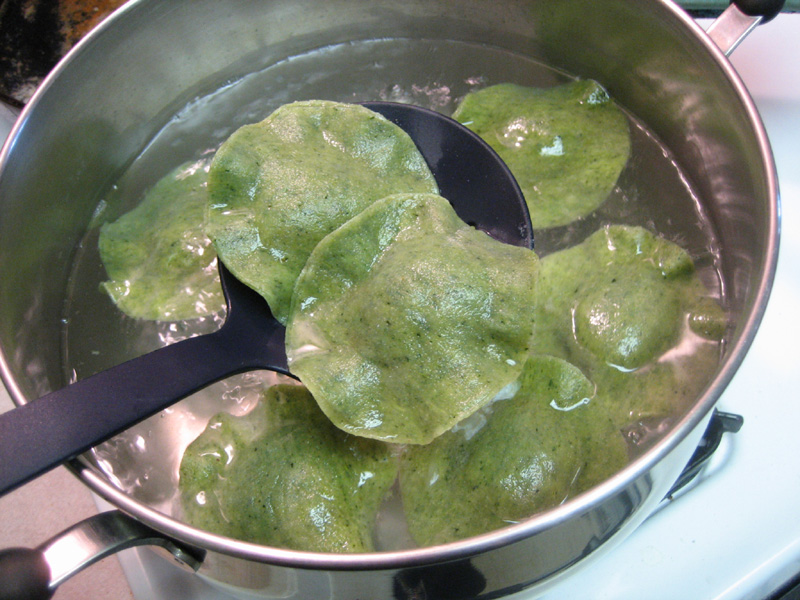
    Boil water. Once boiling, salt well (a good handful of rock salt). Do not crowd the pan with the water. Use a plenty large enough one. I boiled seven raviolis in a large pasta pot. The bigger, the better–they will cook more evenly. The picture below shows what the pasta will look like when it’s about done–it should be slightly floppier than when it went in, but not limp. Usually, fresh pasta takes 3 to 5 minutes.

    Serve with the simple tomato sauce (just a few spoon fulls) on top and some grated fresh Parmesan reggiano. I’d like to note that it is only acceptable to serve Parmesan with tomato sauce when there is also MEAT in the dish. It should never be served with a vegetarian dish or fish dish.

  • Panino: Roast beef with Truffle

    Panino: Roast beef with Truffle

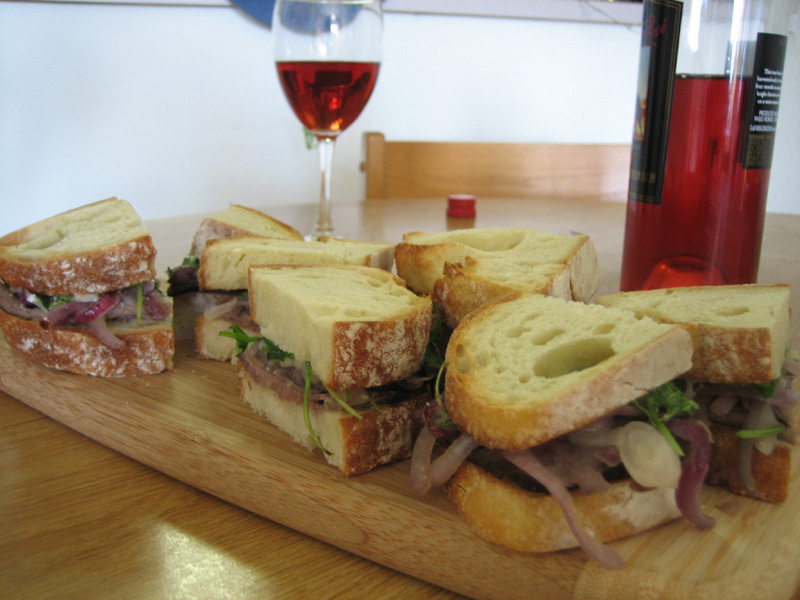
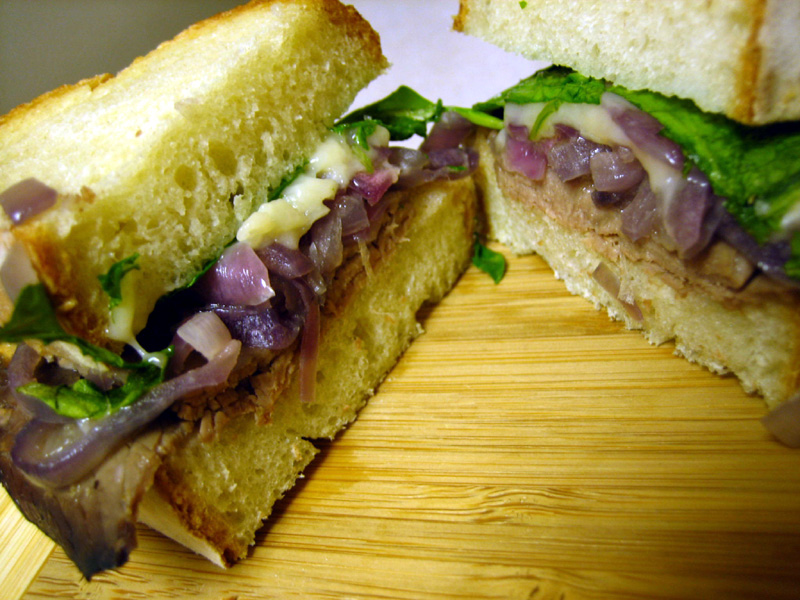
    For lunch today I cracked open an unusual bottle of Tempanillo rose (“Flamenco Rojo”) from a so-so Paso Robles winery that I have an unusual history with (which is a story we’ll save for another time). I paired it with a panino and a friend; Ga Eul came by while I was sauteeing some red onions and the final result was crusty puglese bread sandwiches hot from the oven (a substitute for the panini press I don’t have) stacked with roast beef, carmelized red onions, black truffle oil, shaved parmesean, and arugula. If you have a panini machine, I trust you can figure out how to put this together: my only warning is to not use too much truffle oil, or you WILL ruin your food. If you don’t have a panini machine, here’s what I did from start to finish:

    For sandwiches to feed 3-4 people you will need:

    block of parmesean
    loaf of puglese, medium to small size, or other non-sourdough bread
    1/3 to 1/2 lb roast beef
    enough arugula for one salad
    truffle oil (I prefer black for this sandwich) or truffle spread
    two red onions
    olive oil, salt

    Peel & chop two red onions, heat about two tablespoons of olive oil in a preferably nonstick pan on low-medium heat, add onions. They can be in half sphere slices. Once they are sizzling, turn heat to low. They need to cook on low or they will only brown and the sugar will not carmalize and give it the nice flavor and texture you’re looking for. It will take at least 30 minutes. The onions are done when they become soft and worm like but still have some red color and the thicker pieces will have some snap to them, some moisture. Be sure to season the onions while you’re cooking, liberally with salt.
    Slice your bread into fairly thin slices as we aren’t using a press to make them thinner. Heat your oven to 400 degrees. You will need foil.

    Toast the bread to a golden brown. Cover one side of the sandwich for each one in a drizzle of truffle oil, or a brushing of spread. Next, a slice or two of roast beef. Then, warm carmelized onions (or you can make the onions before and leave the sandwiches in the oven longer). Then, parmesean shavings, quite a lot. Arugula, just a nice handful, and salt–a good shake per sandwich. Wrap each sandwich or pair two sandwiches in foil, airtight. Place them in your 400 degree oven for 10-15 minutes.

    Slice in half, plate. Consider more salt, depending how salty your meat was. THe truffle oil and onions won’t stand out as well without the salt, so this is important.

    And enjoy your pseudo-panino, a nice satisfying hot sandwich without a panini press, and with less fat.


  • How To Make Fresh Italian Egg Pasta

    How To Make Fresh Italian Egg Pasta

    Fettucini al'arribiata fresh recipe

    How to make fresh pasta for two: start with 100 to 120 grams of semola flour (in the US, called Semolina–high protein, less gluten than all-purpose, totally different actually), one fresh egg, some fine salt, a fork, and a wooden board (ideally).

    Ingredients for Egg Pasta mis en place

    Pour your flour into a heap on the board, then plunge your fingers into the center and move in a circular motion to create a pastry “well.” If you don’t have a scale, you should have about this much flour for two people:

    how much flour to make pasta for two

    how much flour to make pasta for two making a well

    Next, you should add salt–a heaping pinch–to the flour, just sprinkle it all on top of the flour. I forgot, so I added mine after the egg. Next, add the egg to the “well,” and whisk gently with a fork at first, until you become fortable, slowly incorporating the flour surrounding it. Be careful not to grab too much flour from any one place or your egg will run amuck! Wait til the egg part is thick enough to not go running away to be rough with the fork/flour situation.

    making pasta by hand

    Once the egg is pretty incorporated, start tossing flour over the wet parts and moving it with your hands, kneading in the rest of the flour (or as much as it will take until its no longer distractingly/annoyingly sticky). You’ll want to start doing that a little after the soupy consistency shown above–it should be getting crumbly almost.

    making pasta by hand mixing dough

    making pasta by hand kneading dough

    Then continue to knead the dough until its got a nice texture and seems fully incorporated, not dry, but not able to easily sop up more flour. Then wrap it in plastic, and let it sit on the counter for at least half an hour. If you want to roll it out the next day or in the next few days, put it in the frige and take it out an hour before you want to roll it as cold dough is harder to make thin.

    Flour a flat surface like a clean kitchen counter lightly with semolina or all-purpose flour. Pat your room temperature, rested egg dough with flour lightly, and shape it into a flat disk with your hands to get started. Take a rolling pin to it (or if you’re lazy and have one, use your pasta machine, but I disapprove of this in general). Get it fairly thin (look at finished noodle thickness) and even. Flour one side generously, and fold loosely (do not crease) to make a log of sorts. Take a knife and cut your noodles however thick you like them–you will need a very sharp knife or you will be miserable.

    Fresh Fettucini Egg Pasta Homemade

    Alternatively, you can cut your raviolis out and attach the two sides with a bit of water, being sure to push the air out from next to the filling before sealing (or they’ll be likely to burst).

    Boil pleanty of water, salt it generously when it comes to a boil. Cook your pasta for two to five minutes depending how thick it is and how narrow your noodles are; for ravioli expect four to six minutes, depending on the filling and how thick the dough is

    I coated mine in a roasted roma tomato, garlic, parsley, chili pepper “salsa” that I had made a day earlier for a roast beef dish, a sort of super-fresh arrabiata sauce, this time.

  • Tonno Carpaccio con Yuzu (Tuna Carpaccio with Yuzu)

    Tonno Carpaccio con Yuzu (Tuna Carpaccio with Yuzu)

    Tonno Carpaccio con Yuzu (Tuna Carpaccio with Yuzu)

    Last night I took my time and made myself an appertifo of sorts: Yellow Fin Tuna Carpaccio with Yuzu and Tarragon sauce. I let the sauce sit on the tuna for about 20 minutes before I ate it so it would all come to room temperature and the tuna would cook a little like ceviche.

  • Tagliatelle a Ragu Bolognese

    Tagliatelle a Ragu Bolognese

    Tagliatelle a Ragu Bolognese

    Fresh Egg Pasta

    I made some Bologna style ragu sauce a couple nights ago (it’s one of my staples) and had leftovers, so for lunch I whipped up some fresh pasta (hand rolled, hand cut, as the people of Emilia-Romagna would have it) and called it a date.

    Here’s the recipe for pasta bolognese.


  • Fritole (Italian Doughnuts)

    Fritole (Italian Doughnuts)

    Venetian Fritole (Italian Doughnuts)

    In April 2011, I rewrote this 2006 recipe to add western measurements to the metric system on the original, and added new, clearer photos. Please enjoy the recipe for Fritole – Italian doughnuts!

  • How to Make Chicken Stock, A Labor of Love

    How to Make Chicken Stock, A Labor of Love

    [donotprint]How to Make Chicken Stock

    Some roommates and other random people have asked me lately about making a stock (and sometimes I find them making stocks and force some advice on them–they thank me later), so I thought I’d share the methodology I have about stock-making. If you have several large pots, I’d make as large a batch as possible, even in multiple pots when you do this, and then package cooled stock into different size tupperware–I then store it in the freezer for up to 3 months, though I’ve had it last much longer than that before and it was fine. This way, you can pull it out whenever you need it, and it’s much tastier and healthier than vacu-packed or canned stock; no packaging residue effecting it and to boot it’s higher protein.[/donotprint]

    Homemade chicken stock can be used in risotto, as a soup base, for hydrating rice, creating a sauce for pasta, and many other things. If you’re feeling sick, it’s great to have it on its own, just cooked down a bit to concentrate the flavor, and with enough salt.

    Home Made Chicken Stock Recipe

    1 organic chicken leg, rinsed (or chicken carcass, chicken spines, etc–the point is, BONES with a bit of meat/fat)
    4 stalks of celery, cleaned & cut in thirds
    3-4 carrots, peeled & cut in thirds
    1 parsnip, lightly peeled cut in chunks
    3 bay leafs
    1 tsp whole peppercorns
    a large handful of fresh thyme
    3 medium white or yellow onions, quartered and peeled
    tablespoon of salt (to be added later)
    COLD or room temp good water (brita filtered or bottled); enough to fill your largest pot.

    Put all ingredients but salt and water in a large pot (or multiple large pots, increasing the quantities). Cover generously with water, leaving about an inch from the top of the pot. Cover with a lid.

    Bring everything to a boil, then reduce heat to low, loosen the lid (slightly cracked) and let simmer for 1-2 hours. When finished, strain carefully and let cool until luke warm or cooler before putting in the refrigerator or freezing it. You can skip this if you’re using it the same day.

    If you added scraps that still have meat, and you intend to use it for something else, you should take it out about 10 minutes after simmering the broth.

    For vegetable stock, you might consider adding mushrooms in place of the meat. For fish stock, you should seek another recipe, because you use far simpler vegetables and lots of fish scraps. It’s so stinky I usually buy mine from a gourmet grocer that makes it in house.

    Notes & Variables for Stock Making

    – Cold Water – Always be sure for any kind of stock to start with cold water. If you add the vegetables and chicken to hot water, you’re only cooking them in the water, not infusing their flavors into it.

    – Using other Meats – The main rule is that you need mostly bones with some meat left on them. You could use a fatty cut of beef like stewing chuck, or turkey if it has the skin and some bones, a different cut of chicken or a whole chicken carcass (it’s a waste to use a whole raw chicken; roast it first and reserve the meat)

    – Using other Herbs – Marjoram, sage, cilantro, or anything not delicate like basil, but the bay leafs are pretty important

    – Using other vegetables – it is OK if you do not have all of the vegetables listeda bove, but carrot, onion, and celery are pretty important; you could skimp on celery if you want. I also like to add not-roting but on-their-way-out greens like kale stems, chard stems (though the red ones will change the color of your stock), broccoli stalks, turnips, turnip greens, fennel tops etc. Sometimes it’s helpful to save scraps (cleaned, in plastic bags, wrapped in paper towels) as you go through the week of cooking to use in stock.